Showing posts with label Farm Nursery. Show all posts

Saturday, 8 January 2011

A Money Saving Mummy - Fabric Letters

I was roaming the shops just the other week (it was my birthday and I was looking for the obligatory 'present for myself!') and I spotted these lovely material covered letters that I thought would look great in Farm Baby's room.  However, the shop they were in was charging £10 a letter and, much as we love farm baby, to spell out her name would cost close to £100 and that just wasn't on.  So in true crafting style I decided that I could make my own - for a fraction of the price!

As I was doing it I decided that I would try and make a tutorial so others can do the same thing!  This is my first ever attempt at a tutorial so be kind! (But please leave a comment if you need anything clarified!)

The ones in the shop were a board backed piece of foam wrapped in material.  I had originally thought to do this as well but in the end I decided on simply making them solid.  If you want to make them 'squashy' then you would need to buy flat wooden letters and foam: cut foam to shape and glue to the wooden letters, then follow below.


Material Covered Letters

You will need:
Board Box Letters
Material in your chosen colour scheme
Fabric Glue
Scissors
An Iron
Pencil or fabric chalk


Place your letter on the material and cut around.  You will need to leave a margin around the entire outer edge.  This margin should be just narrower than the depth of you letters.

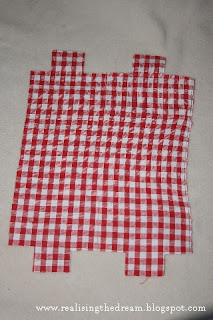
Mark each corner, both inner and outer, of your letter. The for outer corners cut in from both edges. This will mean that the corners will be removed, as in the photo. For internal corners you may wish to experiment. For this 'H' I cut straight up between the 'legs' of the H and stopped a margin's distance from the cross bar. I then cut diagonally from this point to each of the inner corners. This creates a 'Y' shaped cut top and bottom.
Then it is simply a case of gluing the margins up to the side of your letter. Glue all the way around taking care to pull the material tight. Once this has done let the glue dry.
Next cut a strip of fabric that is around 2 cm wider than the depth of your letters. Fold over a one centimetre 'seam' and iron flat. Do the same at both ends.
With the folded edge to the front of your letter glue the strip around the edge of the shape. There will be overlap at the back of the letter which you can glue to the back of the letter, this will create a nice finish to the back edge. You can make this strip as long as the circumference of the letter if you want a clean finish but don't worry if the strip isn't too long. Just make another and continue around, just overlap the ends slightly as you start. I had to do this as my material wasn't long enough and it looks fine!
Stand back and admire your handi-work! You can stand the letters up or attach D-rings to the back (as I will do) so you can hang them on the wall!

Apologies for the 'Y' - this was before I mastered the 'folding it over at the back technique'!  Hand me the glue....
These letters are going to look wonderful, well I think! I am going for cream, a red gingham and red fabrics. Partly what I was looking for anyway and partly because I have the fabric already! In terms of relative cost well, I needed the letters and wood glue so these letters cost me around £2.50 each.  Obviously I didn't have to add the material cost in as I had it already but I think I could have done the whole name with a metre of fabric so my costs would have gone to around perhaps £4 a letter (depending on fabric) but still better than £10 each!!

Saturday, 16 October 2010

Nursery Decorating Part Two...

So the next step of the Nursery decorating was to add some farm animals to the walls. Now, I was uneasy about drawing directly onto the wall without any help, I didn't want to get it wrong and ruin the great paintwork underneath.

So I decided to draw the animals on paper first and use them as a kind of template when I start painting on the wall.  So far I have five animals drawn, I am not sure how many more there will be as I am painting them to fit around the furniture.

I have drawn the animals about 24 inches square, I think this is going to be a reasonable size on the walls without becoming 'scary giant animals'!

I will let you know how the painting goes and whether the template idea works at all!


Wednesday, 13 October 2010

Bumbling Around wth Amigurumi

Meet the bumbles! I have only made four so far but I think I am going to need about 7 - 10.

I have discovered Amigurumi which is a method of crocheting small toys, I believe the name comes from the words for cute and yarn but I am not 100% sure on that fact! I am crocheting them to make a nice mobile for Farm Baby's Nursery. The plan at the moment is to have a bee hive drawn on the wall and a nice bee mobile above. I know, I know, Bumble Bees don't live in hives but I think I can get away with it!

I am liking all the patterns for Amigurumi animals that there are out there so you may see more of these on the blog in upcoming times. I'll try and supply patterns where I can!

If you are into crochet and want to have a go then here is the pattern, it is really simple! If you aren't into crochet give it a go anyway, it's honestly very simple!

Bumble Bee Amigurumi

NOTE: Work in continuous rounds of sc without joining
unless otherwise indicated. Place a marker in first stitch of
round and move up each round.

Abbreviations:
ch = chain
sc = single crochet
dc = double crochet
hdc = half double crochet

To increase (inc) crochet twice into next sc.
To decrease (dec) pick up the next two sc and sc through both.

HEAD AND BODY:
Begin at top of head with A, ch 2.
Rnd 1: 6 sc in 2nd ch from hook.
Rnd 2: 2 Sc in each sc around – 12 sc.
Rnd 3: [Sc in next sc, 2 sc in next sc] 6 times – 18 sc.
Rnd 4: [Sc in next 2 sc, 2 sc in next sc] 6 times – 24 sc.
Rnd 5: [Sc in next 3 sc, 2 sc in next sc] 6times – 30 sc.
Rnds 6-12: Sc in each sc around.
Rnd 13: [Dec] 15 times – 15 sc.
Neck-Rnd 14: [Sc in next 3 sc, dec] 3 times – 12 sc.
Body-Rnd 15: [Inc] 12 times – 24 sc.
Rnds 16 and 17: Sc in each sc around. Cut A. Stuff Head.
Rnds 18-21: With B, sc in each sc around. Cut B.
Rnds 22-24: With A, sc in each sc around.
Rnd 25: Dec] 12 times – 12 sc.
Rnd 26: [Dec] 6 times – 6 sc. Fasten off.

Finish stuffing.
Weave yarn tail through remaining 6 sc, draw up firmly to
gather; fasten securely.

WING (Make 2): With C, ch 7.
Row 1: Sc in 2nd ch from hook and in next ch, hdc in next
2 ch, dc in next ch, 6 dc in last ch; working on opposite
side of ch, dc in next ch, hdc in next 2 ch, sc in last 2 ch;
turn.
Row 2: Ch 1, sc in next 2 sts, hdc in next 2 sts, dc in next
st, 2 dc in each of next 6 sts, hdc in next 2 sts, sc in last 2
sts; turn.
Row 3: Ch 1, slip st in each st around. Fasten off.
Sew in place on back of bee.

LEG (Make 6): With B, ch 7; 3 sc in 2nd ch from hook, slip
st in last 5 ch. Fasten off.
Sew in place.

FEELERS (Make 2): With B, ch 10; slip st in 2nd ch from
hook and in each ch across. Fasten off.

Sew on eyes and mouth, you can use thread, plastic eyes or left over wool like I have to make the features, there is no right or wrong way!

Thursday, 7 October 2010

How Goes the Nursery

As I have revealed already the room at the top of the stairs is more than just a bedroom, its a Nursery. I have been planning the nursery theme for a while and am going with a Farm theme! It was a fight between Jungle and Farm and farm won, as there are so many Jungle themes already out there! The first thing we needed to do was make the wall that splits the existing room. Farm Dad and Farm Guy made huge progress with that, so much so that we managed to get a plasterer in while I was in the hospital!

The plasterer made a fantastic job! The finish on the walls can only be described as feeling like glass, it was amazing to paint on and meant we have an amazingly smooth finish on the paint! The first step was to paint some blue for the sky.


After painting the sky I added some hills with green and painted that green all the way down to the skirting board - or at least to where the skirting board is going to be! For those worried I am not actually doing any of the painting, I have some great helpers actually doing the work while I recover from the hospital. All I have actually done paint wise was the top of the hills! The green on the picture looks quite dull, it is in fact called 'Spearmint' and is quite bright and cartoony!

Next step put on the skirting and door and get it all wood stained. Then on with the next step of the painting....