I was roaming the shops just the other week (it was my birthday and I was looking for the obligatory 'present for myself!') and I spotted these lovely material covered letters that I thought would look great in Farm Baby's room. However, the shop they were in was charging £10 a letter and, much as we love farm baby, to spell out her name would cost close to £100 and that just wasn't on. So in true crafting style I decided that I could make my own - for a fraction of the price!
As I was doing it I decided that I would try and make a tutorial so others can do the same thing! This is my first ever attempt at a tutorial so be kind! (But please leave a comment if you need anything clarified!)
The ones in the shop were a board backed piece of foam wrapped in material. I had originally thought to do this as well but in the end I decided on simply making them solid. If you want to make them 'squashy' then you would need to buy flat wooden letters and foam: cut foam to shape and glue to the wooden letters, then follow below.
Material Covered Letters
You will need:
Board Box Letters
Material in your chosen colour scheme
Fabric Glue
Scissors
An Iron
Pencil or fabric chalk
| Place your letter on the material and cut around. You will need to leave a margin around the entire outer edge. This margin should be just narrower than the depth of you letters. |
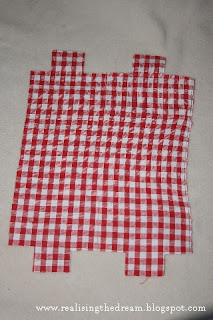
| Mark each corner, both inner and outer, of your letter. The for outer corners cut in from both edges. This will mean that the corners will be removed, as in the photo. For internal corners you may wish to experiment. For this 'H' I cut straight up between the 'legs' of the H and stopped a margin's distance from the cross bar. I then cut diagonally from this point to each of the inner corners. This creates a 'Y' shaped cut top and bottom. |
| Then it is simply a case of gluing the margins up to the side of your letter. Glue all the way around taking care to pull the material tight. Once this has done let the glue dry. |
| Next cut a strip of fabric that is around 2 cm wider than the depth of your letters. Fold over a one centimetre 'seam' and iron flat. Do the same at both ends. |
| With the folded edge to the front of your letter glue the strip around the edge of the shape. There will be overlap at the back of the letter which you can glue to the back of the letter, this will create a nice finish to the back edge. You can make this strip as long as the circumference of the letter if you want a clean finish but don't worry if the strip isn't too long. Just make another and continue around, just overlap the ends slightly as you start. I had to do this as my material wasn't long enough and it looks fine! |
| Stand back and admire your handi-work! You can stand the letters up or attach D-rings to the back (as I will do) so you can hang them on the wall! |
 |
| Apologies for the 'Y' - this was before I mastered the 'folding it over at the back technique'! Hand me the glue.... |
These letters are going to look wonderful, well I think! I am going for cream, a red gingham and red fabrics. Partly what I was looking for anyway and partly because I have the fabric already! In terms of relative cost well, I needed the letters and wood glue so these letters cost me around £2.50 each. Obviously I didn't have to add the material cost in as I had it already but I think I could have done the whole name with a metre of fabric so my costs would have gone to around perhaps £4 a letter (depending on fabric) but still better than £10 each!! |
 I was roaming the shops just the other week (it was my birthday and I was looking for the obligatory 'present for myself!') and I spotted these lovely material covered letters that I thought would look great in Farm Baby's room. However, the shop they were in was charging £10 a letter and, much as we love farm baby, to spell out her name would cost close to £100 and that just wasn't on. So in true crafting style I decided that I could make my own - for a fraction of the price!


Well I am impressed, I think they look great, where did you get the board letters from??
ReplyDeleteAs it happened there was a craft shop just a few doors down. It was one of the Hobbycraft superstore places! Mind boggling array of crafting gear!
ReplyDeleteGreat tutorial! I've shared it on FB & Twitter and intend to give it a go for the girls' room!
ReplyDeleteCheers!
:)
A x