After the inspiration from The Cottage Home tutorial for making a party dress I decided to make a matching head band for the party dress I made and one for the dress and panties set I made from a recycled onesie that Farm Baby had grown to tall for!
I decided that it was time for another tutorial and this lended itself to the task perfectly. So here we go!
Elasticated Bow Headband
Supplies:
Elastic - 1/2 inch width
Material
The sizes a re relative to the size of your little ones head. I will explain how to measure as I go.
Step One:
First measure around your little ladies head and cut a piece of elastic to that length. I make mine fit her as they are with barely any stretch at all - this caters for her head growing! More usage!
Step Two:
Cut a piece of your fabric that is 1.5 times longer than your piece of elastic and 2 1/2 inches wide. I was using left over pieces of fabric and didn't have the length in a single piece. I just cut two pieces and joined them together. For this simple place the two pieces right side together and sew down one short side. Press the seam open.
Step Three:
Fold your long strip in half, right sides together, and sew down the long side. Use 1/4 inch seams, this will create a headband 1 inch wide.
Step Four:
Next turn your fabric tube to it's right side and press flat. Make sure the seam is centred when you do this to keep it hidden when being worn.
Step Five:
Next, attach a safety pin to the end of your elastic and thread it through the fabric tube. You will need to keep hold of the other end as the tube is longer than the elastic. I found that pinning the end in place was the easiest way.
Step Six:
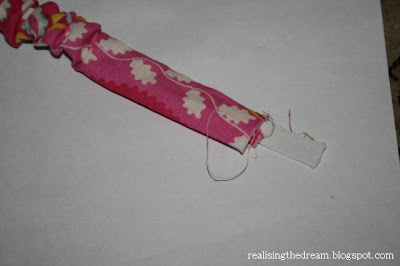
Once the elastic is all the way through simply place one end over the other and sew flat.
Step Seven:
This bit is slightly complicated but I will explain as best I can, if you need clarification please let me know.
You need to decide two things:
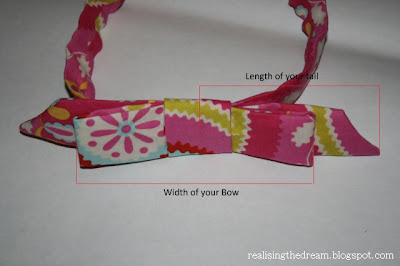
- The width of your bow.
- The length of the tails.
Decide the width of your finished bow and double that length. Decide the length of one of your tails and double that length. Then add those tow together. Add one more inch for seams.
For example, if you want a bow 5" wide with 7" tails then your measurements would be 5x2 = 10, 7 x2 = 14 added together 24. Plus seam allowance = 25 inches.
Cut a piece of material that length and 2 1/2" wide.
Step 8:
Fold your strip in half length ways, right sides together and pin. Cut the short ends at a angle. Next sew around all open edges but leave a small gap halfway down the long side to allow you to turn the tube to its right side.
Once it is turned hand stitch the hole closed and press the tube flat.
Step Nine:
Next fold your tube in half length ways. Measure from the folded end the width of your bow and place a marker pin. So, from our example, for a 5" inch bow measure down 5" and put in pin.
Step Ten:
Next push the folded end in until it meets the pin, creating a 'V' shape.
Step Eleven:
Push the tops of the 'V' away from each other until they are horizontal and bring the free ends up, one to each side.
Step Twelve:
Place the bow onto your headband, across your seam, and sew into place with two lines of stitches. These lines should be positioned to catch all the layers of fabric.
Step Thirteen:
Using a strip of fabric wrap it around the centre of your bow and hand sew at the back.
You're all done!
These little bow headbands can be made from pretty much any fabric so can be co-ordinated to any outfit. Play around with the angle of the tails and the tightness of the middle band. As you can see, on the brown band I pulled the centre band tighter which gave a less square look to the bow. I also, its harder to see in the photo, angled the tails downwards slightly before stitching so they sit slightly lower than the band itself.
Give it a go and add a finsihing touch to your little one's outfit!


No comments:
Post a Comment
I'd love to hear what you think! Please leave a message!