Friday 26 August 2011

The Start of an Empire...

Sorry for many missing posts...  but I have an excuse....

For those of you who have bee following a while you will know that we have several acres of field (around 13) and various outhouses and barns. The original plan was that we had this set up so that I could get a horse - a lifelong dream of mine. This has been put on hold somewhat with the arrival of Farm Baby, but the dream still lives on.  So preparation is key! We have however decided to take that dream just one step further.

We decided that there was enough room and we had enough land to, in some small way, have a few liveries.  Not many, just enough to help with a few bills and to make good use of the land we have.  The idea was born and we began planning.  The large green hay shed was chosen (pretty much as soon as we saw it on the first viewing of the property) as a likely candidate for stables.  This was even before we had thought of liveries, this was just for me!!

A few months ago we had a company round to check the shed and to draw plans up for stabling.  We liked them, they liked the shed and we liked the plans, so it was full steam ahead.  The shed however needed a lot of work.  The photo above shows how it was when we moved in, as you can see it was full of hay and straw and there was no solid bottom to the walls on two sides.  The rabbits had also spent many years digging away and the floor level in the back right corner was somewhat lower than the rest of the barn.  Before the stable fitters could get in we needed to get working.

After a whole weekend of manually clearing the hay and straw from the barn and having a succession of bonfires the shed was ready for some professional work!  Our neighbour is a brickie and very kindly offered his services to put in a retaining wall all the way around the base.  He did this in his spare time, just popping over when he had an hour or two!  And very grateful we are too!  Here is his work as of several weeks ago.  He had done his bit as far as he could, the next step was ours.

We needed the heavy machinery...


We dug a trench out for a central drain and dug a large soak away at the back.  


We then needed a whole lot of this....


This was to cover the whole floor of the barn to allow a concrete top to be added.  This was as close to the barn that the delivery truck could get, so it took two full days of three person labour to get all this in to the barn.  I am a mean digger driver, except when I think about it then it all went everywhere and I couldn't do anything!  They definitely went out of there way to make it as complicated as possible.  For those who haven't driven one it has two levers in front of you which are forward and backwards for each of the tracks beneath, then there is a joystick for each hand that controls buck scoop and empty, arm in and out, arm up and down and cab left and right!  There were also two foot pedals which did something but I just left them alone!  I got the hang of it though and it was quite a relaxing thing to do.  As I chugged along at a slower than walking pace however I couldn't shake the idea of how funny it would be to race these little diggers, they go so ridiculously slowly!  

But then it ended up like this, sorry for the bad photo, we finally have sunshine and it plays havoc with the camera, I also had a puppy pulling his lead at the same time!


This is were we are at the moment.  We are hoping to have the concrete base on by the end of next weekend, so please keep your fingers crossed for us!!

While we were at it, we also re fenced our top paddock and 'claimed' a small section of it as BBQ area.  We will be able to sit in here, watching our animals, eating our burgers and enjoying the fresh air.  It will have a small gate here leading into the field, for person access.  The bigger gate for animals and machinery is up the other end (and isn't actually there).  I will do more on the paddocks at a later date but thought you may enjoy the sneak preview!


Thursday 18 August 2011

Thursday 11 August 2011

Meet My Malamute

There was one family member missing. We had always had a plan to fill that gap but only when we were ready. 
Now we are ready. 
After much research we had settled on exactly what we wanted - the Alaskan Malamute. The only problem was, trying to find a breeder that wasn't hundreds of miles away.  We knew that when they did become available in the area we would have to be ready. Well, last Sunday the time came, and it turned out that the breeder was only 5 minutes down the road!  We had seen her ad before and had let it pass as her price was a little too high for us,  then we noticed that she had re posted so we tried our luck and asked if she could reduce her price at all.  She did.  It was on!

We went along, hoping that the puppy viewing would be successful but preparing to ask all the questions needed. If anything wasn't right we would have to walk away. When we arrived there was only one pup remaining. We peaked over the door into the stall and there was a, pretty huge, wiggly puppy. He was very cute and friendly. Farm Baby loved him and announced "cat!" Not quite, but not a bad guess! We asked about him, particularly why he was left when the others had gone. Apparently she had taken a deposit on him at the same time as the other pups went. The new owners were to pick him up when they returned from holiday last week. When they did return they contacted her and said they no longer wanted him. This was why she had re listed her ad (and also probably why she was more willing to lower her price). All his papers were in order and he was healthy and active so we made the decision and he came home with us that night.

And so we know have a Farm Dog, please let me introduce...  Apache, the Red and White Alaskan Malamute!  He is 11 weeks old and already weighs in at around 10 kg (that's 1 st 8 lbs for people who think like me!).  It is reckoned he'll reach around the 40 kg (6 st 4 lbs) mark.  He is settling in well and has already pretty much mastered Come and Sit, although the Malamute stubbornness is showing its head occasionally!  The cats and chickens are teaching him a few manners too.  He will go to puppy classes to help his socialisation, but as he was late to be brought to a new home, he was behind on his injections, so we have to wait another three weeks before he can really venture out safely.


Wednesday 10 August 2011

Elasticated Ribbon Headband Tutorial

After the inspiration from The Cottage Home tutorial for making a party dress I decided to make a matching head band for the party dress I made and one for the dress and panties set I made from a recycled onesie that Farm Baby had grown to tall for!

I decided that it was time for another tutorial and this lended itself to the task perfectly.  So here we go!

Elasticated Bow Headband

Supplies:
Elastic - 1/2 inch width
Material

The sizes a re relative to the size of your little ones head.  I will explain how to measure as I go.


Step One:
First measure around your little ladies head and cut a piece of elastic to that length.  I make mine fit her as they are with barely any stretch at all - this caters for her head growing!  More usage!


Step Two:
Cut a piece of your fabric that is 1.5 times longer than your piece of elastic and 2 1/2 inches wide.  I was using left over pieces of fabric and didn't have the length in a single piece.  I just cut two pieces and joined them together.  For this simple place the two pieces right side together and sew down one short side.  Press the seam open.


Step Three:

Fold your long strip in half, right sides together, and sew down the long side.  Use 1/4 inch seams, this will create a headband 1 inch wide.


Step Four:

Next turn your fabric tube to it's right side and press flat.  Make sure the seam is centred when you do this to keep it hidden when being worn.


Step Five:

Next, attach a safety pin to the end of your elastic and thread it through the fabric tube.  You will need to keep hold of the other end as the tube is longer than the elastic.  I found that pinning the end in place was the easiest way.  


Step Six:

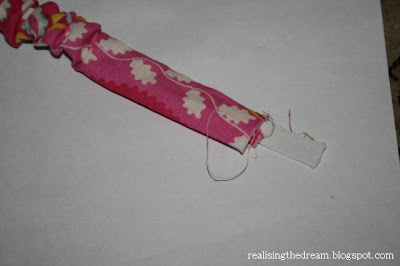
Once the elastic is all the way through simply place one end over the other and sew flat.


Step Seven:

This bit is slightly complicated but I will explain as best I can, if you need clarification please let me know.

You need to decide two things:
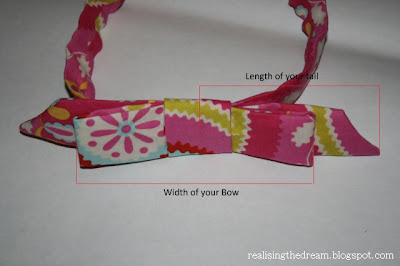
  1. The width of your bow.
  2. The length of the tails.
Decide the width of your finished bow and double that length.  Decide the length of one of your tails and double that length.  Then add those tow together.  Add one more inch for seams.

For example, if you want a bow 5" wide with 7" tails then your measurements would be 5x2 = 10, 7 x2 = 14 added together 24.  Plus seam allowance = 25 inches.

Cut a piece of material that length and 2 1/2" wide.


Step 8:

Fold your strip in half length ways, right sides together and pin.  Cut the short ends at a angle.  Next sew around all open edges but leave a small gap halfway down the long side to allow you to turn the tube to its right side.

Once it is turned hand stitch the hole closed and press the tube flat.


 Step Nine:

Next fold your tube in half length ways.  Measure from the folded end the width of your bow and place a marker pin.  So, from our example, for a 5" inch bow measure down 5" and put in pin.


Step Ten:

Next push the folded end in until it meets the pin, creating a 'V' shape.


Step Eleven:
Push the tops of the 'V' away from each other until they are horizontal and bring the free ends up, one to each side.


Step Twelve:
Place the bow onto your headband, across your seam, and sew into place with two lines of stitches.  These lines should be positioned to catch all the layers of fabric.


Step Thirteen:

Using a strip of fabric wrap it around the centre of your bow and hand sew at the back. 

You're all done!


These little bow headbands can be made from pretty much any fabric so can be co-ordinated to any outfit.  Play around with the angle of the tails and the tightness of the middle band.  As you can see, on the brown band I pulled the centre band tighter which gave a less square look to the bow.  I also, its harder to see in the photo, angled the tails downwards slightly before stitching so they sit slightly lower than the band itself.  


Give it a go and add a finsihing touch to your little one's outfit!


Sunday 7 August 2011

In a Trug


Its been a while since a garden-y related post so I thought I would get you all up to speed.  It has been a busy time.  As you can see the hens have been laying like crazy.  I love just looking at the eggs, SO MANY different colours!  'Aint it purdy!?  You can really see the difference of the Wheaten Marans' chocolatey coloured eggs when they are all together like this.

The garden has continued to produce.  The summer raspberries are, I think, beginning to give up but just behind them the autumn fruiters are taking their place.  The strawberries too have done their thing, this is the last that the patch had to offer.


The broad beans have had the perfect weather, some days of heavy rain and then warm sun, they went crazy.  Great big fat pods.  The peas are catching up fast too.  The runner beans have started to flower, better late than never and just this afternoon I planted out some french beans!  Taa Da!  This is the third batch I am trying and it has taken this long to encourage them not to die!


Garlic has been pulled and is hanging to dry.  I did have photos but it looked like what it was, a bunch of mud covered garlic hanging in a dark shed, I saved you the boredom.


It has certainly been a busy place, the veggie patch, these last few weeks.  I shall keep you updated as things progress further!  I am hoping to try more winter growings this year so I shall be getting to grips with those soon!

Wednesday 3 August 2011

Farmyard Designs!

I decided to have another go at clothing making. I am still going to stick with making things for the Farm Baby as it is quicker and what is better than making my little girl look cute! I decided to go with making her a party dress for her birthday next month (I can't believe that it has been a whole year!) so I set out to find the perfect pattern.  It was then that I happened upon this blog - http://thecottagehome.blogspot.com/ - and it has become a favourite.  I found a great pattern here and decided to go for it!  

I had picked up the spotty material when we were in town a couple of days ago, I discovered it in the fabric shops remenants bin for £3.  It was perfect for the job.

I really enjoyed myself, so much so that I had to post my creation before it was quite finished - I haven't got the buttons for the back yet.  But I am very pleased with it and am already looking at material to make a second one, more of a sundress style for everyday, with some nice bright flowery fabric!

So, take a look at the finished (ish) product.  Apologies for the photos, I don't know how people make photos of clothes look so professional, mine just come out looking, well... flat!  But you can get the idea!


There was some left over fabric so I sat and played around for a while and eventually came up with a Bow Headband to go with it!  She's all set for her birthday now!!


If you are loving this and want to give it a go then check out the pattern HERE.